In this tutorial, we show:
These are only quick instructions how to install the client (optionally also the server) in order to access the public(/local) Netgraph server. For details, please consult the installation instructions. Further information can be found in the user manual for the client and in the user manual for the server.
Please note that Java Runtime Environment (JRE) must be installed in order to run the Netgraph client. It is not a part of Netgraph installation programs - it must be installed separately. At least version 1.5 is needed (the client was compiled in Java 1.5.0_12). The newest version of JRE for various platforms can be downloaded from http://java.sun.com/javase/downloads/. Please note that the Netgraph client may not work with other-parties versions of Java Runtime Environment. Namely, it does not work with gij (GNU libgcj) version of Java distributed with Fedora systems (at least up to Fedora 8). In case of troubles, please check which version of Java is started from the installed icon of the Netgraph client.
For Linux and MS Windows, installation programs for the client and/or the server are available. Please choose and run the appropriate version of the installation program for your system:
For other systems, please consult the installation instructions.
During the installation, the user can choose parts of the program to install. Either only the Netgraph client is installed (to access the public Netgraph server via the Internet), or the Netgraph server along with the Prague Dependency Treebank 2.0 sample data are installed, or both the client and the server (along with the data). For accessing the public Netgraph server (or any other non-local server), choose only the installation of the client. At least the following icon should appear on your desktop, with the label “Netgraph client 1.93”:
![]()
To access a locally installed Netgraph server and search in the Prague Dependency Treebank 2.0 sample data, choose the installation of the client and the server. Then, also the following icon appears on your desktop, with label “Netgraph server 1.93”:
![]()
Note: You may also want to see a flash demonstration of the Netgraph client usage.
Start the Netgraph client (by clicking on the client icon). A dialog window appears:
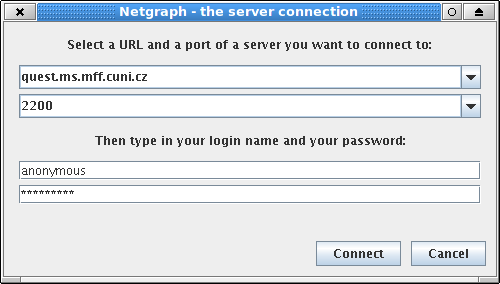
Fill-in the following connection and login information:
and click on the button “Connect” to establish a connection to the server.
First, start the Netgraph server (by clicking on the server icon). A terminal window should appear with the following text:
The Netgraph server version 1.93 L (8.4.2008)

The server is trying to bind to the port: 2000 ... OK

The server has started and is waiting for connections.
Then, start the Netgraph client (by clicking on the client icon). A dialog window just like for the public server appears. This time, fill-in this connection and login information:
and click on the button “Connect” to establish a connection to the server.
After the connection to the server is established, the following window appears:
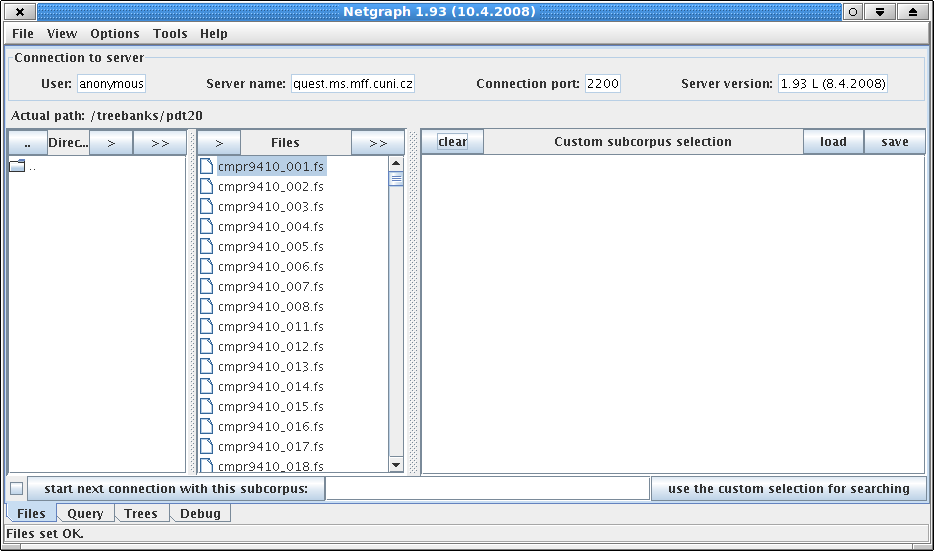
Files
with trees for searching are selected here. To select the whole treebank for searching, perform these steps
(the first step is only applicable for accessing the locally installed Netgraph server):
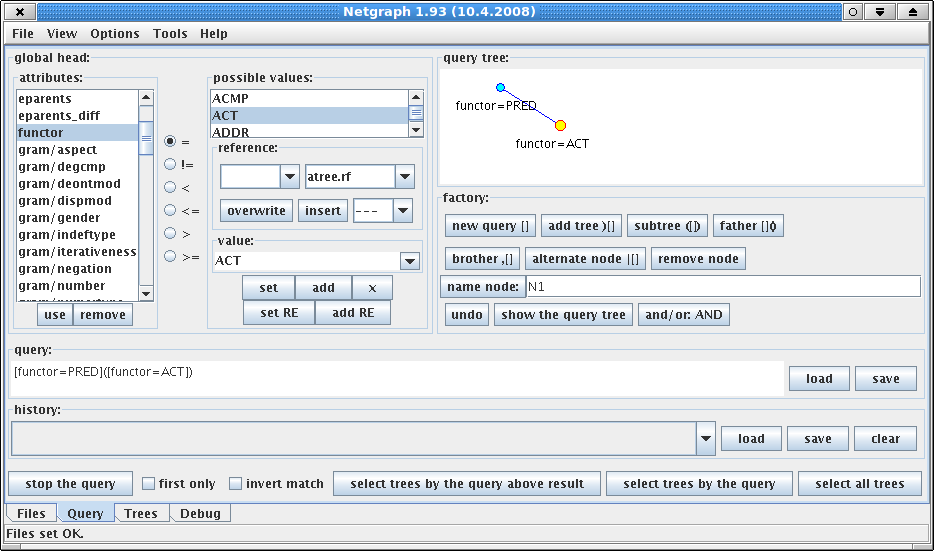
The second tab in the window named “Query” is automatically selected, as shown in the picture:
The
query is created here. (On
the other hand, it is possible to simply browse all trees from the
selected files without setting a query, by clickingg on the button
“select all trees”.)
On the left side, there is a list of available
attributes. Possible values of enumeration type of attributes are
listed in the table “possible values”. The graphical
representation of the query is depicted in the right top corner in
panel “query tree”. The textual representation of the query is in
the text field “query”. Both representations of the query are
empty now.
If you are connected to the server for the tectogrammatical trees, to create the query from the picture, follow these steps:
click on the button “new query” in the panel “factory” on the right side; a node appears in the graphical representation of the query
find attribute “functor” in the list of attributes on the left side and double-click on it (alternatively, single-click on it and click on the button “use” at the bottom of the list); the name of the attribute appears in the textual version of the query (NOT yet in the graphical version)
find value “PRED” in the list of possible values and double-click on it (alternatively, single-click on the value and click on the button “set” below the list); an expression “functor=PRED” appears both in the graphical and in the textual representation of the query
click on the button “subtree” in the panel “factory”; a son-node of the Predicate is created
double-click on attribute “functor” in the list of attributes
find value “ACT” in the list of possible values and double-click on it; an expression “functor=ACT” appears both in the graphical and in the textual representation of the query at the son-node
The query should be created now just like in the picture above. Click on the button “select trees by the query” on the bottom to send the query to the server. The interface switches automatically to the tab “Trees”, and the first result tree should appear (if you are searching in the locally installed sample data, a different tree appears):
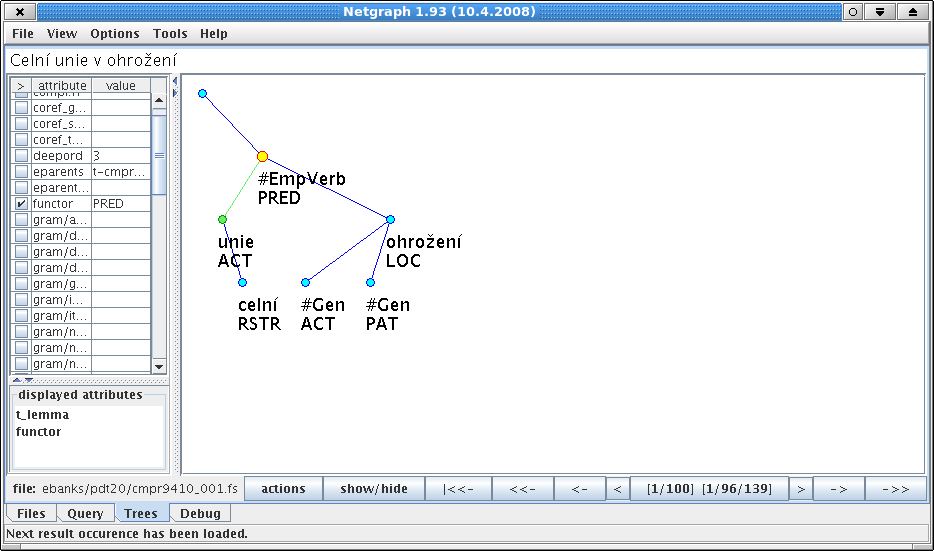
A
list of available attributes can be found on the left side. Choose
some of the attributes to be displayed at the nodes in the trees,
e.g. ”t_lemma”
and ”functor”,
to match the picture.
Buttons “<-” and “->” can be used for browsing the occurrences of the query in the result trees. Buttons “<<-” and “->>” skip multiple occurrences of the query in one tree, and buttons “<” and “>” can be used to browse context trees.
The anonymous user has several restrictions:
For the full access to the data without restrictions, a non-anonymous user account has to be created. Contact the author of Netgraph to have a full account created: mirovsky@ufal.mff.cuni.cz.
To create another query, choose the “Query” tab from the list of tabs at the bottom of the window.